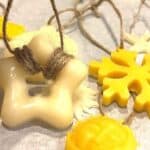
How To Make Beeswax Ornaments
Have fun learning how to make beeswax ornaments with your kids as a new Christmas family tradition to add this year!THERE ARE MANY IMPORTANT TIPS IN THE POST ABOUT WORKING WITH BEESWAX AND MAKING ORNAMENTS FROM BEESWAX. SCROLL UP TO READ THEM!
Servings: 6
Cost: $20
Equipment
- Double boiler
- Metal ladle with pour spout (optional)
- Toothpicks or skewers (optional, to help make holes for ribbon)
- Small scissors (optional, but can help trim away any spillover)
- Baking sheet(s)
- Wax paper or parchment paper
Ingredients
- 1 pound yellow or white beeswax pellets
- Essential oils scent optional
- Holiday silicone molds of choice medium to large
- Ribbon twine, or ornament hangers
Instructions
- Put water in bottom of double boiler pan. Bring water to a boil and then reduce heat to low.
- Place beeswax pellets into top pot and place on top of doubler boiler with water. Slowly melt beeswax on low heat.
- Prepare silicone molds by placing them on a baking sheet (to protect counter from any over spill). Make sure the sheets are on a flat, even surface (or else the wax won't fill into all the details of your silicone molds).
- OPTIONAL: Once wax is melted, removed from heat and immediately add a few drops of essential oil scent. (Optional, we didn't use any scents.)
- Immediately and CAREFULLY pour beeswax into prepared molds (pouring directly from the pot or from a metal ladle with pour spout), being careful to minimize the spillover if possible. Beeswax sets quickly, so don't allow it to be off the heat too long before pouring it in the holiday mold ornaments.
- After a couple of minutes, and once you see the beeswax start to set and change colors, gently press your ribbon or ornament hanger into the top. **SEE NOTE BELOW**
- Allow ornaments to set for around 20 minutes. (It may take longer or shorter depending on the size and thickness of your molds.)
- Once set, gently remove the ornament from the molds and place on wax paper or parchment paper. Trim away any spillover with small scissors. Continue threading ornaments with ribbon or ornament hangers.
- Hang your handmade ornaments on the tree and enjoy!
Notes
*Some ornament molds already have holes in them for the ribbon. If you're using those kinds of ornament molds you can skip step #6 and just thread your ribbon or hanger into the hole after they have been removed from the molds.
*You can also make your own hole with a toothpick or skewer BEFORE the ornaments set completely and while they are still in the mold. Just make them big enough that you can thread ribbon, twine, or ornament holds through.
*If your ornaments do not want to come out of the molds, freeze them for a little while. If they're still difficult to remove, you may want to spray the molds with cooking oil on the next round.