DIY Ice Lantern Ideas
These beautiful ice luminary candle holders are fun for a winter party or as a snow day activity with kids. CRAFT TIPS: We put important tips (especially about getting ice lanterns out of molds) in the body of the post. Please scroll up and read the tips before making this winter craft!
Servings: 1
Cost: $5
Equipment
- Duct tape or packing tape
Ingredients
- Medium to large bowl
- Small 6 ounce plastic cup
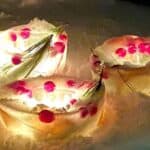
- Decorative items pine needles, leaves, cranberries, orange slices, lemon slices, grapefruit slices, pine branches, rosemary, etc.*
- Water
Instructions
- Place the small plastic cup in the middle of your bowl. Tape across the top of the cup onto the side of the bowl so that the cup doesn't move (but leave room to pour water into the bowl and place your decorations in the bowl!).
- Arrange decorative items (berries, branches, oranges slices, etc.) in the bowl (around the cup). Remember, the bowl wall area is where you will be able to best see the berries (etc) when you un-mold the lantern. Pack items into the space around the cup. (It's OK if some of the items stick above the bowl. Our pine branches were above the bowl and I thought it made the ice lantern really beautiful.)
- Carefully pour water in the bowl over the decorative items. DON'T FILL THE WATER ALL THE WAY TO THE TOP BECAUSE WATER EXPANDS WHEN FROZEN INTO ICE.
- Carefully place bowl outside (if temperatures are freezing or below) or in the freezer. Allow to freeze solid. (Depending on the size of your lantern and how you're freezing, this could be anywhere from a few hours up to 12-24 hours.)
- TO UN MOLD ICE LANTERNS
- Run a pan of lukewarm water.
- Gently place frozen ice lantern bowl into pan for around 10 seconds.
- Remove bowl from water. Gently remove cup from middle of ice and then turn over to remove lantern from bowl. If the ice lantern doesn't unmold easily, repeat the steps in #3 (this step) until it slides out.
- Place outside in snow. Add tea light candle to hole in middle, light, and enjoy in the evening!
Notes
*You can use any decorative items for your ice luminary lantern. We used:
- Cranberries
- Fresh orange slices
- Fresh lemon slices
- Pine branches
- Pine needles