No-Carve Pumpkin Cat Family Craft
This is one of my favorite pumpkin ideas because everyone in the family can make their own cute pumpkin decoration to add to the "cat family."
Servings: 1
Equipment
- Hot glue gun or Glue Dots if you have young children and don't want them using a hot glue gun.
Ingredients
- 1 medium size pumpkin for mama cat body
- 1 smaller pumpkin for mama cat head
- Mini pumpkins as many as needed
- Halloween colored craft paper for ears and tail--we used black with white polka dots and orange grid
- Black craft paper
- Self adhesive laminating pouches
- Black paper doilies optional, for mama cat "eyelashes"
- White craft paper
- White and black pipe cleaners
- Decorative ribbon style/color of choice, for mama cat's collar
- Googly eyes
- Glue sticks
- Black permanent marker
Instructions
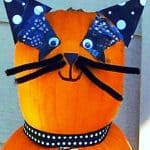
FOR THE MAMA CAT:
- Prepare the largest pumpkin (body) for the smaller pumpkin (head) to sit on top of. You'll need to: choose a pumpkin without a stem so that the other pumpkin can sit on top of it OR cut a small portion of the top off (like a lid) so the head of the cat can sit down in it a little
- FOR THE EYES: If you're using doilies as the eye lashes: cut two triangles, with the lace pattern part on the larger end.
- Using the white craft paper, cut the same shape as the black paper doilies. Glue the doilies on top of the white craft paper shape using a glue stick. Let dry.
- From the bottom (short) side of the black paper, cut a half moon shape. Then, cut that shape in half (down the middle). That will be the background for the mama cat's googly eyes.
- Glue one part of the half moon shape to the doilie "eyelash" at the smaller end of the eyelash. Repeat with the other.
- Now, glue one googly eye onto each eye corner. Allow to dry.
- Hot glue the eyes onto the pumpkin face.
- FOR THE EARS: Using the craft paper (of choice) for the mama's ears, cut out two large triangles.
- Place the triangles between a laminating pouch and close the top, pressing down to make sure it is flat with no creases. Cut out the triangle ("ears) from the laminating paper, leaving about 1/4-inch of lamination around the ears. (If you cut the triangle right at the paper triangle, the laminating sleeve won't stick.)
- Hot glue the triangle ears on each side of the top of the smaller pumpkin (the mama cat's "head").
- Under the eyes, draw a nose and mouth with a permanent black marker. (We drew a triangle nose and then connected the mouth under.)
- Cut two black pipe cleaners in half for whiskers. Hot glue the two whiskers coming from each side of the nose.
- Carefully place the mama cat's head onto the medium pumpkin body. Using a ribbon to tie around the "neck" for the cat's collar.
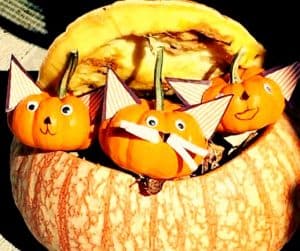
FOR THE KITTENS:
- For the kittens, use mini pumpkins.
- Repeat the process to make ears from above (Steps 8-10 from the mama cat).
- Hot glue googly eyes onto the mini pumpkin face.
- Using a permanent black marker, draw a nose and mouth.
- Cut a white pipe cleaner into fourths. Hot glue two white pipe cleaners on each side of mini kitten nose.
- Repeat until all mini kitten pumpkins are made. You can vary faces and ears, if you like! (For some, we didn't put mouths or whiskers.)
Notes
We used a big, round, hollowed out pumpkin to put our mini kitten pumpkins in for the porch!