
Need pumpkin design ideas? Ready for Halloween fun and carving pumpkins? Been wanting to try some no-carve pumpkin decorating ideas, pumpkin painting ideas for kids, or need easy to carve pumpkin ideas? We have great pumpkin crafts and super cute no carve pumpkin ideas for cat family that makes fun Halloween kids’ activities!

EASY PUMPKIN DESIGN IDEAS FOR KIDS
If you’re so over the mess of Halloween pumpkin carving (even though you love those yummy roasted pumpkin seeds), there are many creative and easy pumpkin ideas that don’t involve pumpkin carving! And, these pumpkins are great alternatives to pumpkins painting ideas!
ENTER: No carve pumpkin decorating ideas.
Pumpkin Ideas That Don’t Involve Carving
Fun ideas for pumpkin decorating for no-carve pumpkins:
- Get creative with pumpkin painting ideas and paint pumpkins (including painted pumpkin faces!)–don’t miss our Pumpkin Painting Tutorial below
- Do a crayon-drip pumpkin
- Create a glitter pumpkin
- Make a fall pumpkin display of decorated, ornamental pumpkins
- Wrap pumpkins in fabric and ribbons
- Make pumpkin mummies (pumpkins wrapped in gauze with eyes glued on)
- Use no carve kids pumpkin decorating kits
- Use jack o’lantern stencils on pumpkins to make kids pumpkin patterns
- Use pumpkin stickers for jackolantern faces (or all over decorations!)
- Use Mr. Potato Head parts on your pumpkins
ALSO CHECK OUT:
Ideas for Pumpkin Recipes and Pumpkin Activities for Kids
Is Pumpkin A Fruit: Pumpkin Facts, Lessons for Kids, FREE PRINTABLE
Benefits of No-Carve Pumpkin Ideas
Pumpkin ideas no carving are good because:
- No sticky pumpkin guts / pumpkin clean-up
- Toddler-friendly (although if you’re wondering How do you carve a pumpkin for a toddler? there are safe pumpkin carving kits for younger kids)
- Safer for younger kids—no giant knife or risking injury!
- No-carve pumpkins last longer than carved jack-o-lanterns
- Can be less time consuming
- It works for a group of kids at all ages and stages
- Pumpkin ideas easy for crafts
- No-carve pumpkins are just as fun and cool looking!
(Keep scrolling for the kitty cat pumpkins!)
Can you paint real pumpkins?
Yes! You can paint real pumpkins. The best paint for pumpkins is either spray paint or acrylic paint with a sealant.
(see full how do I paint a pumpkin directions below)
What paints to use on pumpkins?
- One of the easiest ways to decorate pumpkins with paint is to use spray paint. (And, BONUS, that you can get them in all kinds of cool Halloween paint colors!) Spray the pumpkin outdoors and allow to dry. Then, decorate with stickers or stencils.
- You can also hand paint pumpkins, but you’ll want to use acrylic paints with a sealant for a better result.
(Don’t miss our cat designs on pumpkins later in the post!)
CHECK OUT THIS FRIENDLY MONSTERS ACTIVITY PACK FROM OUR SISTER SITE THAT IS GREAT FOR HALLOWEEN PRINTABLES!

Kid Printables Coloring Pages & MORE!
HOW TO PAINT PUMPKINS
If you’re looking for pumpkin ideas simple (especially for a group), painting pumpkins is it!
(The cat pumpkin ideas without carving is after this.)
How to Paint Pumpkins Tutorial
Equipment
- Paper plates (to pour paint on)
- Newspaper (to prepare and protect the work surface)
Ingredients
- Pumpkins size and number of choice
- Acrylic paints colors of choice
- Acrylic paint sealer like Mod Podge Matte Sealer
- Foam paint brushes
Instructions
- Spread newspaper on table to cover and protect your work surface. (If you have paint shirts or smocks for the little ones, this is a great time to use them!)
- Gently wipe your pumpkins with a dry cloth to remove any dirt.
- Using a foam brush, apply Mod Podge Matte Sealer to the entire surface of each pumpkin. Allow to dry.
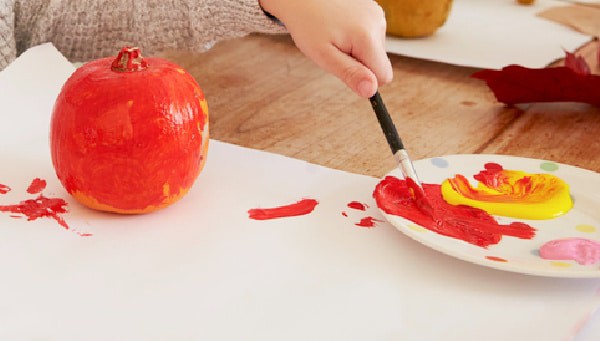
- Pour each color of paint into their own paper plate. Be sure to use a different foam brush for each color.
- Lay pumpkin on its side and start painting at the bottom and swiping up to the top of the pumpin (toward the stem). Continue painting the portion of the pumpkin that is facing up. Once the bottom is dry, sit pumpkin up and paint remaining areas. Allow to dry, 20-30 minutes or until dry to touch. (Drying time will vary based on brand and quality of paint.)
- Apply a second coat or touch up areas, if needed.
- When completely dry, apply the second sealing coat of Mod Podge Matte Sealer. Allow to dry.
- Leave your pumpkin as a beautiful, plain painted pumpkin or add stencils, painted pumpkin faces, stickers, or more!
Notes
Cute Pumpkin Ideas: No-Carve Pumpkin Cat Family Craft
For our pumpkin ideas with no carving, we decided to make cat pumpkins.
(Well, an entire pumpkin cat family, actually!)
I love this because it makes pumpkin carving ideas unique crafts.
This pumpkin craft doesn’t involve carving and they make for sweet Halloween decorations and maybe even a winning idea for a pumpkin decorating contest and put you into the “no carve pumpkin contest winners”! (These really are cute ideas for pumpkin decorating contest!)
Although this is the perfect pumpkin craft for all ages, it is especially good if you’re looking for Halloween crafts for preschoolers or Halloween craft for toddlers because it doesn’t involve using sharp instruments and cutting a pumpkin.
Also, the little ones will love making their own little kitten cute pumpkins to go along with the mama and/or papa cat!
We used glue on eyes for our cat pumpkins, but you can also draw cat faces on pumpkins if you want.

No-Carve Pumpkin Cat Family Craft
Equipment
- Hot glue gun or Glue Dots if you have young children and don't want them using a hot glue gun.
Ingredients
- 1 medium size pumpkin for mama cat body
- 1 smaller pumpkin for mama cat head
- Mini pumpkins as many as needed
- Halloween colored craft paper for ears and tail--we used black with white polka dots and orange grid
- Black craft paper
- Self adhesive laminating pouches
- Black paper doilies optional, for mama cat "eyelashes"
- White craft paper
- White and black pipe cleaners
- Decorative ribbon style/color of choice, for mama cat's collar
- Googly eyes
- Glue sticks
- Black permanent marker
Instructions
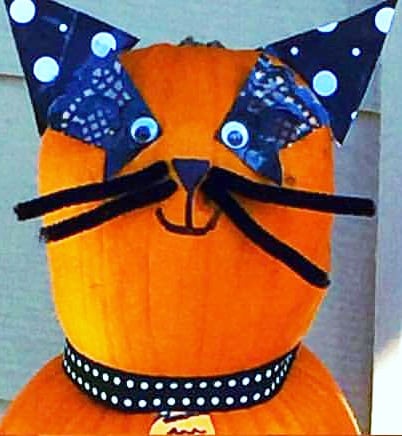
FOR THE MAMA CAT:
- Prepare the largest pumpkin (body) for the smaller pumpkin (head) to sit on top of. You'll need to: choose a pumpkin without a stem so that the other pumpkin can sit on top of it OR cut a small portion of the top off (like a lid) so the head of the cat can sit down in it a little
- FOR THE EYES: If you're using doilies as the eye lashes: cut two triangles, with the lace pattern part on the larger end.
- Using the white craft paper, cut the same shape as the black paper doilies. Glue the doilies on top of the white craft paper shape using a glue stick. Let dry.
- From the bottom (short) side of the black paper, cut a half moon shape. Then, cut that shape in half (down the middle). That will be the background for the mama cat's googly eyes.
- Glue one part of the half moon shape to the doilie "eyelash" at the smaller end of the eyelash. Repeat with the other.
- Now, glue one googly eye onto each eye corner. Allow to dry.
- Hot glue the eyes onto the pumpkin face.
- FOR THE EARS: Using the craft paper (of choice) for the mama's ears, cut out two large triangles.
- Place the triangles between a laminating pouch and close the top, pressing down to make sure it is flat with no creases. Cut out the triangle ("ears) from the laminating paper, leaving about 1/4-inch of lamination around the ears. (If you cut the triangle right at the paper triangle, the laminating sleeve won't stick.)
- Hot glue the triangle ears on each side of the top of the smaller pumpkin (the mama cat's "head").
- Under the eyes, draw a nose and mouth with a permanent black marker. (We drew a triangle nose and then connected the mouth under.)
- Cut two black pipe cleaners in half for whiskers. Hot glue the two whiskers coming from each side of the nose.
- Carefully place the mama cat's head onto the medium pumpkin body. Using a ribbon to tie around the "neck" for the cat's collar.

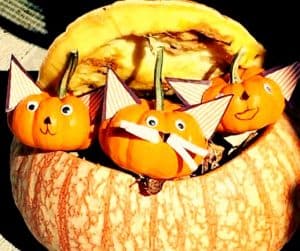
FOR THE KITTENS:
- For the kittens, use mini pumpkins.
- Repeat the process to make ears from above (Steps 8-10 from the mama cat).
- Hot glue googly eyes onto the mini pumpkin face.
- Using a permanent black marker, draw a nose and mouth.
- Cut a white pipe cleaner into fourths. Hot glue two white pipe cleaners on each side of mini kitten nose.
- Repeat until all mini kitten pumpkins are made. You can vary faces and ears, if you like! (For some, we didn't put mouths or whiskers.)
Notes
If you’re looking for cat carvings on pumpkins or cat stencils for pumpkins, try the no-carve pumpkin idea!
MORE HALLOWEEN PUMPKIN ACTIVITIES: MAKE A PUMPKIN FAIRY HOUSE

What do you think about our non carving pumpkin ideas?
SO CUTE! Can’t wait to show my daughter the little ones and makes those with her preschool class!