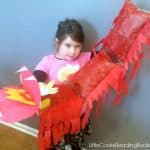
Chinese New Year Dancing Dragon Craft
This is a fun and easy Chinese dragon craft and your kids will have a lot of fun dancing around with it while learning about Chinese New Year. I only selected "medium" difficulty because of the time it takes to dry for painting. Creating and putting together the dragon is easy!NOTE: REVIEWING THE PICTURE COLLAGE IN THE POST WILL REALLY HELP YOU WITH ASSEMBLING THE DRAGON CRAFT! BE SURE TO SCROLL UP!
Servings: 1
Equipment
- Paint brush
- Markers or crayons
- Glue stick or glue
- Hot glue gun and glue
- Scissors
Ingredients
- Packing Pillows we used 3 large, attached packing pillows, but you can use small pillows also in any number you want
- Red acrylic paint or plastic spray paint
- Red tissue paper
- Red streamers
- Construction paper in the following colors: white yellow, red
- Wide ribbon optional, to make handles underneath
Instructions
- Measure a length of packing air pillows as long as you want your dragon to be (we used three large air pillows) and cut them from the roll. BE SURE TO LEAVE THEM ATTACHED TO EACH OTHER FOR THE BODY. This will be the dragon's body.
- Paint the top and bottom of the air pillows with red paint. Allow to dry for at least 30 minutes (or until dry to touch).
- FOR THE EYES: While paint is drying, cut two large ovals out of the white construction paper for eyes. Using markers or crayons, draw pupils on each of the ovals. (You can see my daughter made our dragon have crazy eyes.) If you want your dragon's eyes to have "eyelashes," cut then out of the black or yellow construction paper. Glue then to the (back) of the top of the eyes. Set aside to dry.
- FOR THE DRAGON MOUTH/SNOUT: Place two pieces of red construction paper on top of each other and turn them so they are horizontal. Cut around the outside edges so that the paper is more of a large oval shaped. At the bottom of the horizontal pages, cut a small notch so that the mouth and snout dent in a little. (see picture) Set aside. (My daughter decided she wanted to draw nostrils, as you can see in the picture, but you don't have to.)
- FOR THE TONGUE FLAME: Turn a yellow piece of paper so that it is horizontal. Starting from the bottom middle, cut up and then make three flame tips (see picture). This will be pasted inside the mouth, so you want it about half as wide as the mouth. Repeat the process with the red construction paper, making it much smaller than the yellow one. Then make another yellow one, that is smaller than the red one. Using a glue stick, glue the small yellow flame on top of the small red "flame." Then Glue those onto the large red flame. Set aside to dry.
- FOR THE TEETH: Cut three long, skinny triangles out of the white construction paper. Set aside.
- TO ASSEMBLE THE MOUTH: Line the straight edge of the "Flames" with the back of the bottom of the mouth (away from the notch). Use the glue stick to glue just the straight edge at the back of the mouth (leave the pointy ends of the flames sticking up). Glue the edge of the top of the mouth onto the bottom of the mouth, leaving the front open.
- Take the eyes and carefully fold a small portion of the bottoms of the eyes. This will create a "tab" to glue onto the face. With the glue stick, place glue on the bottom of the eye "tab" you just folded. In the middle of the top mouth (at the back), press the eyes down and hold them until they dry. (SEE PICTURE FOR PLACEMENT)
- Now, glue the white triangle "teeth" onto the inside of the mouth. We glued two on the top front edges and one in the middle (edge) on the bottom.
- Once the painted body of the dragon is dry, take the red tissue paper and measure one piece against the width of one of the air pillows. Cut the tissue paper's width to match the width of the pillows. CAREFULLY USING THE HOT GLUE GUN AND NOT TOUCHING THE PLASTIC AIR PILLOWS WITH THE GLUE GUN TIP (WE RECOMMENDED PARENTS DOING THIS), place a line of hot glue along the edge (width) of one of the air pillow sides. Immediately place the tissue paper edge on the glue and let dry. Repeat this process with each individual air pillow.
- Once each tissue paper section has dried, cut 6-8 streamer sections, starting from the bottom and cutting up toward the dragon's body and stopping about 2 inches before you get to the body. Cut the streamers for each tissue paper section. This is what will give your dragon movement when dancing around with it.
- ATTACH THE HEAD: On the bottom of the mouth (at the back), place a line of hot glue. CAREFULLY press the head onto the front of one end of the air pillows. Allow to dry completely.
- OPTIONAL STEP: If you want to make it easier for the kids to hold the dragon while dancing around with it, you can use the hot glue to glue a ribbon handle on the bottom (tummy) of the dragon--one at the front and one at the back.